
Embarking on an interior design project for your home can feel exhilarating and, admittedly, a little daunting. You have a vision, a collection of saved images, and a desire to create a space that truly feels like your own. But where do you begin? How do you translate those ideas into a cohesive, functional, and beautiful reality without getting lost in the details?
The secret to a successful, stress-free transformation isn’t magic—it’s a structured process. For professionals at firms like JOYA Architects, a clear, methodical approach is what turns creative concepts into flawlessly executed homes. This roadmap is best visualized as an interior design process flow chart.
Think of it as your project’s GPS. This article will demystify that entire journey, breaking it down into 5 key phases. We’ll walk you through each step, clarify your crucial role as the client, and provide a downloadable flowchart to keep you and your project on track from start to finish.
The Complete Interior Design Process Flow Chart
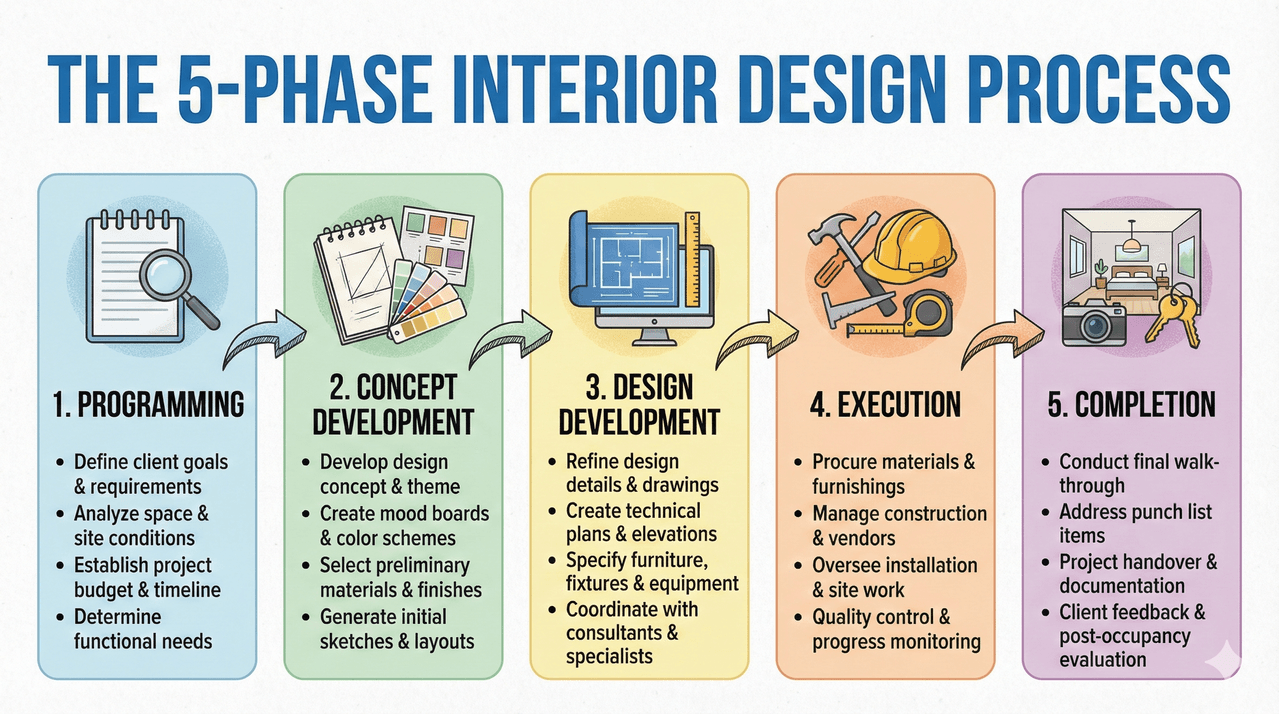
This flowchart provides a bird’s-eye view of your design journey. Each phase builds upon the last, ensuring every decision is made thoughtfully and in the right order. We encourage you to download this flowchart and use it as a reference throughout your project.
Phase 1: Initial Consultation & Programming (The Foundation)
This foundational phase is all about discovery. Before a single colour is chosen or a floor plan is drawn, we need to understand the most important element of the project: you. This stage is a deep dive into your needs, goals, and the practicalities of the project, ensuring we build the design on a solid foundation of mutual understanding.
The Client Briefing & Lifestyle Analysis
This is more than just a chat; it’s a strategic interview. We’ll discuss your vision, aesthetic preferences, and, most importantly, how you live. We explore questions like:
- How do you use the space on a daily basis?
- Do you entertain guests frequently?
- Do you work from home?
- What are your family’s needs, now and in the future?
- What are your absolute must-haves and what are your pain points with the current space? The goal is to design a home that not only looks stunning but also functions intuitively for your specific lifestyle.
Defining Project Scope, Budget, and Timelines
Clarity here is non-negotiable. Together, we establish clear boundaries for the project. This includes defining the exact areas to be designed, setting a realistic and comfortable budget, and outlining an initial project timeline. Being transparent about financial expectations at this stage prevents surprises later on and allows the design to be tailored to your investment level.
Realistic Timeline: This initial programming phase typically takes 1-3 weeks, depending on the complexity of your project and the speed of decision-making.
Site Measurement & Existing Conditions Analysis
Our team conducts a thorough on-site survey. This involves taking precise measurements of the entire space, locating structural elements, and noting the placement of existing electrical, plumbing, and mechanical systems. This technical step is crucial for accurate space planning and helps identify potential challenges (like an immovable beam) or hidden opportunities (like a space that could be opened up).
Your Role as the Client: What to Prepare
Your input is most critical in this phase. To make our initial meetings as productive as possible, we recommend you prepare the following:
- Inspiration Photos: Create a Pinterest board or a collection of images that capture the feeling, colours, and styles you love. This is a powerful visual communication tool.
- “Must-Haves” vs. “Nice-to-Haves”: Make a simple two-column list. This helps prioritize budget and design features. For example, a larger kitchen island might be a “must-have,” while a wine fridge is a “nice-to-have.”
- Think About Your Routine: Be ready to discuss your daily life. Knowing that you need a spot for your keys and mail by the door or that you love to read in the morning sun helps us design a home that works for you.
Phase 2: Concept Development & Space Planning (The Vision)
With the foundation laid, this is where the creative vision begins to take tangible form. Our designers translate the information gathered in Phase 1 into initial visual and spatial ideas. It’s an exploratory and exciting stage where we test possibilities and define the core aesthetic and functional direction of your home.
Creating Mood Boards & Conceptual Sketches
We transform abstract ideas into a tangible aesthetic. A mood board is a curated collage of images, colour palettes, material samples (like fabric swatches or wood finishes), and textures that collectively define the desired look and feel of the space. This is often accompanied by early conceptual sketches to give you a first glimpse of the design’s direction.
Schematic Design & Bubble Diagrams
Before getting into detailed furniture placement, we start with the big picture. Schematic design, often using simple “bubble diagrams,” is a way of blocking out zones within a floor plan. This helps visualize how different areas will function and relate to one another—for example, ensuring the dining “bubble” has a good flow to the kitchen “bubble” and the living “bubble.”
Detailed Space Planning & Floor Layouts
Once the general zones are approved, we move to detailed space planning. We create to-scale floor plans that show the precise arrangement of furniture, cabinetry, and fixtures. This critical step ensures optimal traffic flow, ergonomic comfort, and verifies that your chosen furniture will fit perfectly within the space. We analyze every angle to maximize both function and aesthetic harmony.
Tools of the Trade: From Pinterest to CAD Software
To bring these ideas to life, we use a range of professional tools. While inspiration may start on platforms like Pinterest, the actual planning involves sophisticated software. Programs like AutoCAD are used for precise 2D technical floor plans, while software like SketchUp or Coohom helps create 3D models and renderings, giving you a realistic preview of how the finished space will look and feel.
Phase 3: Design Development & Documentation (The Blueprint)
This is the phase where we refine the approved concept into a detailed, actionable plan. Every single element of the design is now selected, specified, and documented. The outcome of this phase is a comprehensive set of blueprints and specifications that will guide the contractors and tradespeople during construction.
Selecting Materials, Finishes, and Fixtures (FFF)
We move from general ideas to specific choices. This is the hands-on process of selecting every finish and material for your home. This includes:
- Flooring: The exact hardwood, tile, or carpet.
- Paint & Wall Coverings: Specific paint codes and wallpaper selections.
- Lighting: All decorative and architectural light fixtures.
- Hardware: Cabinet pulls, door handles, and tapware.
- Countertops & Tile: The specific slab of stone and backsplash tile.
Furniture, Lighting, and Decor Sourcing
Alongside the fixed finishes, we identify and specify all the movable items. This involves selecting the exact furniture pieces from specific vendors, sourcing lighting, choosing rugs, and planning for window treatments. Each item is chosen to fit the scale, style, and budget established in the design concept.
Creating Detailed Construction Drawings & Specifications
This is the most technical part of the design process. Our team produces a full set of construction drawings. These are not just floor plans; they are highly detailed documents that include electrical plans (showing outlet and switch locations), lighting plans, elevations (views of each wall), and detailed drawings for any custom joinery or architectural features. These documents leave no room for guesswork during construction.
Your Role as the Client: Providing Clear Feedback
Your decisive approval is paramount in this phase. We will present you with all the selections and drawings for your review and sign-off. It is crucial to provide timely and clear feedback. Making changes at this stage—on paper—is simple. Making those same changes once materials have been ordered or construction has begun can lead to significant delays and budget increases.
Phase 4: Execution & Implementation (Bringing it to Life)
With the blueprint signed off, it’s time to make it a reality. This is where the physical work begins, managed by your design team and executed by skilled contractors and artisans. Our role shifts from creative direction to meticulous project management, ensuring the design is built exactly as specified.
Procurement & Order Management
This is the complex logistical process of purchasing everything for your project. Our team handles placing orders for all specified furniture, fixtures, and materials. We then manage the entire process, including tracking lead times, coordinating deliveries, and inspecting items upon arrival to ensure they are correct and undamaged.
Contractor Coordination & Project Management
Your designer acts as the central point of contact between you and all the tradespeople involved. We liaise with the general contractor, electricians, plumbers, painters, and installers to ensure everyone is working from the correct plans and adhering to the project schedule. This coordination is key to a smooth and efficient construction process.
Construction, Installation, and On-Site Supervision
Our team makes regular site visits to oversee the construction and installation work. We are there to answer contractor questions, solve any unforeseen issues that arise, and ensure the highest standards of quality are being met. This on-site supervision guarantees that the built work is a faithful execution of the approved design documents.
How Long Does This Phase Take?
The execution phase is typically the longest part of the project. The timeline can vary greatly based on the scope of work. For a single-room cosmetic update, this might take 4-8 weeks. For a full renovation of a landed home in Singapore, this phase can easily take 6 months or more, depending on the extent of construction and the lead times for custom materials.
Phase 5: Project Completion & Evaluation (The Final Reveal)
This is the final and most rewarding phase of the entire process. The dust has settled, the contractors have finished their work, and we are ready to add the final layers that transform the house into your home. It’s all about the finishing touches and ensuring every detail is perfect.
Furniture Staging, Styling, & Accessorizing
Once the main construction is complete, the pre-ordered furniture is delivered and placed according to the floor plan. This is followed by the final, magical layer of styling. We bring in and arrange all the decor, including rugs, lamps, art, cushions, and accessories. This is what truly brings the space to life and infuses it with personality.
The Final Client Walkthrough & Punch List
We will walk through the completed project with you for a final inspection. Together, we will create a “punch list”—a simple term for a list of any minor items that need correction or adjustment. This could be a small paint touch-up, a stiff cabinet door, or a crooked light switch. The contractor will then address every item on this list until the project is 100% complete to your satisfaction.
Post-Occupancy Evaluation & Project Handoff
At the official project handoff, we may provide you with a binder containing all relevant documentation, such as warranties for appliances, specifications for materials, and care instructions for finishes. We often schedule a follow-up visit after you’ve had some time to live in the space to see how it’s functioning for you and answer any remaining questions.
Your Project’s Roadmap to Success
As you can see, a professional interior design process is a structured, collaborative, and deeply thoughtful journey—not a chaotic one. It’s a partnership designed to protect your investment, save you time, and prevent costly mistakes.
By following a clear interior design process flow chart, we ensure that your vision and our expertise are perfectly aligned at every turn. This methodical approach is what manages expectations, guarantees quality, and ultimately delivers a beautiful, functional home that exceeds your dreams.
Ready to start your own design journey with a team that values clarity and collaboration? Download our free Interior Design Process Flow Chart to keep your project on track. Or, if you’re ready to take the first step towards transforming your home, contact our design team at JOYA Architects today for a complimentary consultation. WhatsApp us at +6591920393 to see how we can guide you through every phase.